Newer
Older
// Control which views the slide number displays on using the "showSlideNumber" value:
//     "all": show on all views (default)
// "speaker": only show slide numbers on speaker notes view
//   "print": only show slide numbers when printing to PDF
Reveal.configure({ showSlideNumber: 'speaker' });

Press »ESC« or »O« keys to toggle the overview mode on and off. While you're in this mode, you can still navigate between slides,
as if you were at 1,000 feet above your presentation. The overview mode comes with a few API hooks:

```javascript
Reveal.addEventListener( 'overviewshown', function( event ) { /* ... */ } );
Reveal.addEventListener( 'overviewhidden', function( event ) { /* ... */ } );

// Toggle the overview mode programmatically
Reveal.toggleOverview();
```
Just press »F« on your keyboard to show your presentation in fullscreen mode. Press the »ESC« key to exit fullscreen mode.
Add `data-autoplay` to your media element if you want it to automatically start playing when the slide is shown:

```html
<video data-autoplay src="http://clips.vorwaerts-gmbh.de/big_buck_bunny.mp4"></video>
If you want to enable or disable autoplay globally, for all embedded media, you can use the `autoPlayMedia` configuration option. If you set this to `true` ALL media will autoplay regardless of individual `data-autoplay` attributes. If you initialize with `autoPlayMedia: false` NO media will autoplay.

Note that embedded HTML5 `<video>`/`<audio>` and YouTube/Vimeo iframes are automatically paused when you navigate away from a slide. This can be disabled by decorating your element with a `data-ignore` attribute.

### Embedded iframes
reveal.js automatically pushes two [post messages](https://developer.mozilla.org/en-US/docs/Web/API/Window.postMessage) to embedded iframes. `slide:start` when the slide containing the iframe is made visible and `slide:stop` when it is hidden.
Sometimes it's desirable to have an element, like an image or video, stretch to consume as much space as possible within a given slide. This can be done by adding the `.stretch` class to an element as seen below:
```html
<section>
	<h2>This video will use up the remaining space on the slide</h2>
    <video class="stretch" src="http://clips.vorwaerts-gmbh.de/big_buck_bunny.mp4"></video>
</section>
```

Limitations:
- Only direct descendants of a slide section can be stretched
- Only one descendant per slide section can be stretched

When reveal.js changes the scale of the slides it fires a resize event. You can subscribe to the event to resize your elements accordingly.
Reveal.addEventListener( 'resize', function( event ) {
	// event.scale, event.oldScale, event.size
} );
The framework has a built-in postMessage API that can be used when communicating with a presentation inside of another window. Here's an example showing how you'd make a reveal.js instance in the given window proceed to slide 2:

```javascript
<window>.postMessage( JSON.stringify({ method: 'slide', args: [ 2 ] }), '*' );
```
#### postMessage Events
When reveal.js runs inside of an iframe it can optionally bubble all of its events to the parent. Bubbled events are stringified JSON with three fields: namespace, eventName and state. Here's how you subscribe to them from the parent window:

```javascript
window.addEventListener( 'message', function( event ) {
	var data = JSON.parse( event.data );
if( data.namespace === 'reveal' && data.eventName === 'slidechanged' ) {
		// Slide changed, see data.state for slide number
	}
} );
```
#### postMessage Callbacks

When you call any method via the postMessage API, reveal.js will dispatch a message with the return value. This is done so that you can call a getter method and see what the result is. Check out this example:

```javascript
<revealWindow>.postMessage( JSON.stringify({ method: 'getTotalSlides' }), '*' );

window.addEventListener( 'message', function( event ) {
	var data = JSON.parse( event.data );
	// `data.method`` is the method that we invoked
	if( data.namespace === 'reveal' && data.eventName === 'callback' && data.method === 'getTotalSlides' ) {
		data.result // = the total number of slides
	}
} );
```

#### Turning postMessage on/off

This cross-window messaging can be toggled on or off using configuration flags. These are the default values.
```javascript
Reveal.initialize({
	// Exposes the reveal.js API through window.postMessage
	postMessage: true,

	// Dispatches all reveal.js events to the parent window through postMessage
	postMessageEvents: false
});
```

Presentations can be exported to PDF via a special print stylesheet. This feature requires that you use [Google Chrome](http://google.com/chrome) or [Chromium](https://www.chromium.org/Home) and to be serving the presentation from a web server.
Here's an example of an exported presentation that's been uploaded to SlideShare: http://www.slideshare.net/hakimel/revealjs-300.
### Separate pages for fragments
[Fragments](#fragments) are printed on separate slides by default. Meaning if you have a slide with three fragment steps, it will generate three separate slides where the fragments appear incrementally.

If you prefer printing all fragments in their visible states on the same slide you can set the `pdfSeparateFragments` config option to false.
Export dimensions are inferred from the configured [presentation size](#presentation-size). Slides that are too tall to fit within a single page will expand onto multiple pages. You can limit how many pages a slide may expand onto using the `pdfMaxPagesPerSlide` config option, for example `Reveal.configure({ pdfMaxPagesPerSlide: 1 })` ensures that no slide ever grows to more than one printed page.
To enable the PDF print capability in your presentation, the special print stylesheet at [/css/print/pdf.css](https://github.com/hakimel/reveal.js/blob/master/css/print/pdf.css) must be loaded. The default index.html file handles this for you when `print-pdf` is included in the query string. If you're using a different HTML template, you can add this to your HEAD:

<script>
	var link = document.createElement( 'link' );
	link.rel = 'stylesheet';
	link.type = 'text/css';
	link.href = window.location.search.match( /print-pdf/gi ) ? 'css/print/pdf.css' : 'css/print/paper.css';
	document.getElementsByTagName( 'head' )[0].appendChild( link );
</script>
1. Open your presentation with `print-pdf` included in the query string i.e. http://localhost:8000/?print-pdf. You can test this with [revealjs.com?print-pdf](http://revealjs.com?print-pdf).
* If you want to include [speaker notes](#speaker-notes) in your export, you can append `showNotes=true` to the query string: http://localhost:8000/?print-pdf&showNotes=true
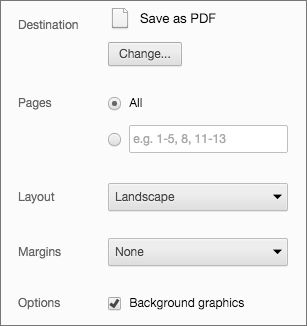
1. Open the in-browser print dialog (CTRL/CMD+P).
1. Change the **Destination** setting to **Save as PDF**.
1. Change the **Layout** to **Landscape**.
1. Change the **Margins** to **None**.
1. Enable the **Background graphics** option.
1. Click **Save**.

Alternatively you can use the [decktape](https://github.com/astefanutti/decktape) project.
## Theming

The framework comes with a few different themes included:
- black: Black background, white text, blue links (default theme)
- white: White background, black text, blue links
- league: Gray background, white text, blue links (default theme for reveal.js < 3.0.0)
- beige: Beige background, dark text, brown links

- night: Black background, thick white text, orange links
- serif: Cappuccino background, gray text, brown links
- simple: White background, black text, blue links

- solarized: Cream-colored background, dark green text, blue links
Each theme is available as a separate stylesheet. To change theme you will need to replace **black** below with your desired theme name in index.html:
<link rel="stylesheet" href="css/theme/black.css" id="theme">
```

If you want to add a theme of your own see the instructions here: [/css/theme/README.md](https://github.com/hakimel/reveal.js/blob/master/css/theme/README.md).

Hakim El Hattab
a validé
## Speaker Notes

reveal.js comes with a speaker notes plugin which can be used to present per-slide notes in a separate browser window. The notes window also gives you a preview of the next upcoming slide so it may be helpful even if you haven't written any notes. Press the »S« key on your keyboard to open the notes window.

A speaker timer starts as soon as the speaker view is opened. You can reset it to 00:00:00 at any time by simply clicking/tapping on it.
Notes are defined by appending an `<aside>` element to a slide as seen below. You can add the `data-markdown` attribute to the aside element if you prefer writing notes using Markdown.
Alternatively you can add your notes in a `data-notes` attribute on the slide. Like `<section data-notes="Something important"></section>`.
Hakim El Hattab
a validé
When used locally, this feature requires that reveal.js [runs from a local web server](#full-setup).
Hakim El Hattab
a validé
```html
<section>
	<h2>Some Slide</h2>
Hakim El Hattab
a validé
<aside class="notes">
Oh hey, these are some notes. They'll be hidden in your presentation, but you can see them if you open the speaker notes window (hit »S« on your keyboard).
Hakim El Hattab
a validé
	</aside>
</section>
```
If you're using the external Markdown plugin, you can add notes with the help of a special delimiter:

Hakim El Hattab
a validé
<section data-markdown="example.md" data-separator="^\n\n\n" data-separator-vertical="^\n\n" data-separator-notes="^Note:"></section>
# Title
## Sub-title

Here is some content...
Note:
This will only display in the notes window.
#### Share and Print Speaker Notes
Notes are only visible to the speaker inside of the speaker view. If you wish to share your notes with others you can initialize reveal.js with the `showNotes` configuration value set to `true`. Notes will appear along the bottom of the presentations.
When `showNotes` is enabled notes are also included when you [export to PDF](https://github.com/hakimel/reveal.js#pdf-export). By default, notes are printed in a box on top of the slide. If you'd rather print them on a separate page, after the slide, set `showNotes: "separate-page"`.

#### Speaker notes clock and timers
The speaker notes window will also show:

- Time elapsed since the beginning of the presentation.  If you hover the mouse above this section, a timer reset button will appear.
- Current wall-clock time
- (Optionally) a pacing timer which indicates whether the current pace of the presentation is on track for the right timing (shown in green), and if not, whether the presenter should speed up (shown in red) or has the luxury of slowing down (blue).

The pacing timer can be enabled by configuring the `defaultTiming` parameter in the `Reveal` configuration block, which specifies the number of seconds per slide. 120 can be a reasonable rule of thumb. Alternatively, you can enable the timer by setting `totalTime`, which sets the total length of your presentation (also in seconds). If both values are specified, `totalTime` wins and `defaultTiming` is ignored. Regardless of the baseline timing method, timings can also be given per slide `<section>` by setting the `data-timing` attribute (again, in seconds).

In some cases it can be desirable to run notes on a separate device from the one you're presenting on. The Node.js-based notes plugin lets you do this using the same note definitions as its client side counterpart. Include the required scripts by adding the following dependencies:
	dependencies: [
		{ src: 'socket.io/socket.io.js', async: true },
		{ src: 'plugin/notes-server/client.js', async: true }
	]
});
1. Install [Node.js](http://nodejs.org/) (4.0.0 or later)
2. Run `npm install`
3. Run `node plugin/notes-server`
Hakim El Hattab
a validé
Plugins should register themselves with reveal.js by calling `Reveal.registerPlugin( 'myPluginID', MyPlugin )`. Registered plugin instances can optionally expose an "init" function that reveal.js will call to initialize them.
When reveal.js is booted up via `Reveal.initialize()`, it will go through all registered plugins and invoke their "init" methods. If the "init" method returns a Promise, reveal.js will wait for that promise to be fullfilled before finshing the startup sequence and firing the [ready](#ready-event) event. Here's an example of a plugin that does some asynchronous work before reveal.js can proceed:
init: () => new Promise( resolve => setTimeout( resolve, 3000 ) )
};
Reveal.registerPlugin( 'myPlugin', MyPlugin );
Reveal.addEventListener( 'ready', () => console.log( 'Three seconds later...' ) );
Reveal.initialize();
```
If the init method does _not_ return a Promise, the plugin is considered ready right away and will not hold up the reveal.js startup sequence.
### Retrieving Plugins

If you want to check if a specific plugin is registered you can use the `Reveal.hasPlugin` method and pass in a plugin ID, for example: `Reveal.hasPlugin( 'myPlugin' )`. If you want to retrieve a plugin instance you can use `Reveal.getPlugin( 'myPlugin' )`.
The multiplex plugin allows your audience to view the slides of the presentation you are controlling on their own phone, tablet or laptop. As the master presentation navigates the slides, all client presentations will update in real time. See a demo at [https://reveal-js-multiplex-ccjbegmaii.now.sh/](https://reveal-js-multiplex-ccjbegmaii.now.sh/).

The multiplex plugin needs the following 3 things to operate:
1. Master presentation that has control
2. Client presentations that follow the master
3. Socket.io server to broadcast events from the master to the clients

#### Master presentation

Served from a static file server accessible (preferably) only to the presenter. This need only be on your (the presenter's) computer. (It's safer to run the master presentation from your own computer, so if the venue's Internet goes down it doesn't stop the show.) An example would be to execute the following commands in the directory of your master presentation:
1. `npm install node-static`
2. `static`
If you want to use the speaker notes plugin with your master presentation then make sure you have the speaker notes plugin configured correctly along with the configuration shown below, then execute `node plugin/notes-server` in the directory of your master presentation. The configuration below will cause it to connect to the socket.io server as a master, as well as launch your speaker-notes/static-file server.
You can then access your master presentation at `http://localhost:1947`
// Example values. To generate your own, see the socket.io server instructions.
		secret: '13652805320794272084', // Obtained from the socket.io server. Gives this (the master) control of the presentation
		id: '1ea875674b17ca76', // Obtained from socket.io server
url: 'https://reveal-js-multiplex-ccjbegmaii.now.sh' // Location of socket.io server
{ src: '//cdnjs.cloudflare.com/ajax/libs/socket.io/2.2.0/socket.io.js', async: true },
{ src: 'plugin/multiplex/master.js', async: true },
		// and if you want speaker notes
		{ src: 'plugin/notes-server/client.js', async: true }
	]
});
```

#### Client presentation
Served from a publicly accessible static file server. Examples include: GitHub Pages, Amazon S3, Dreamhost, Akamai, etc. The more reliable, the better. Your audience can then access the client presentation via `http://example.com/path/to/presentation/client/index.html`, with the configuration below causing them to connect to the socket.io server as clients.
```javascript
Reveal.initialize({
// Example values. To generate your own, see the socket.io server instructions.
		secret: null, // null so the clients do not have control of the master presentation
		id: '1ea875674b17ca76', // id, obtained from socket.io server
url: 'https://reveal-js-multiplex-ccjbegmaii.now.sh' // Location of socket.io server
{ src: '//cdnjs.cloudflare.com/ajax/libs/socket.io/2.2.0/socket.io.js', async: true },
{ src: 'plugin/multiplex/client.js', async: true }
Server that receives the `slideChanged` events from the master presentation and broadcasts them out to the connected client presentations. This needs to be publicly accessible. You can run your own socket.io server with the commands:

1. `npm install`
2. `node plugin/multiplex`
Or you can use the socket.io server at [https://reveal-js-multiplex-ccjbegmaii.now.sh/](https://reveal-js-multiplex-ccjbegmaii.now.sh/).
You'll need to generate a unique secret and token pair for your master and client presentations. To do so, visit `http://example.com/token`, where `http://example.com` is the location of your socket.io server. Or if you're going to use the socket.io server at [https://reveal-js-multiplex-ccjbegmaii.now.sh/](https://reveal-js-multiplex-ccjbegmaii.now.sh/), visit [https://reveal-js-multiplex-ccjbegmaii.now.sh/token](https://reveal-js-multiplex-ccjbegmaii.now.sh/token).
You are very welcome to point your presentations at the Socket.io server running at [https://reveal-js-multiplex-ccjbegmaii.now.sh/](https://reveal-js-multiplex-ccjbegmaii.now.sh/), but availability and stability are not guaranteed.

For anything mission critical I recommend you run your own server. The easiest way to do this is by installing [now](https://zeit.co/now). With that installed, deploying your own Multiplex server is as easy running the following command from the reveal.js folder: `now plugin/multiplex`.
##### socket.io server as file static server
The socket.io server can play the role of static file server for your client presentation, as in the example at [https://reveal-js-multiplex-ccjbegmaii.now.sh/](https://reveal-js-multiplex-ccjbegmaii.now.sh/). (Open [https://reveal-js-multiplex-ccjbegmaii.now.sh/](https://reveal-js-multiplex-ccjbegmaii.now.sh/) in two browsers. Navigate through the slides on one, and the other will update to match.)
```javascript
Reveal.initialize({
// Example values. To generate your own, see the socket.io server instructions.
		secret: null, // null so the clients do not have control of the master presentation
		id: '1ea875674b17ca76', // id, obtained from socket.io server
		url: 'example.com:80' // Location of your socket.io server
	},
{ src: '//cdnjs.cloudflare.com/ajax/libs/socket.io/2.2.0/socket.io.js', async: true },
{ src: 'plugin/multiplex/client.js', async: true }
It can also play the role of static file server for your master presentation and client presentations at the same time (as long as you don't want to use speaker notes). (Open [https://reveal-js-multiplex-ccjbegmaii.now.sh/](https://reveal-js-multiplex-ccjbegmaii.now.sh/) in two browsers. Navigate through the slides on one, and the other will update to match. Navigate through the slides on the second, and the first will update to match.) This is probably not desirable, because you don't want your audience to mess with your slides while you're presenting. ;)
```javascript
Reveal.initialize({
// Example values. To generate your own, see the socket.io server instructions.
		secret: '13652805320794272084', // Obtained from the socket.io server. Gives this (the master) control of the presentation
		id: '1ea875674b17ca76', // Obtained from socket.io server
		url: 'example.com:80' // Location of your socket.io server
	},
{ src: '//cdnjs.cloudflare.com/ajax/libs/socket.io/2.2.0/socket.io.js', async: true },
		{ src: 'plugin/multiplex/master.js', async: true },
		{ src: 'plugin/multiplex/client.js', async: true }
If you want to display math equations in your presentation you can easily do so by including this plugin. The plugin is a very thin wrapper around the [MathJax](http://www.mathjax.org/) library. To use it you'll need to include it as a reveal.js dependency, [find our more about dependencies here](#dependencies).
The plugin defaults to using [LaTeX](http://en.wikipedia.org/wiki/LaTeX) but that can be adjusted through the `math` configuration object. Note that MathJax is loaded from a remote server. If you want to use it offline you'll need to download a copy of the library and adjust the `mathjax` configuration value.
Below is an example of how the plugin can be configured. If you don't intend to change these values you do not need to include the `math` config object at all.
```js
Reveal.initialize({
	// other options ...

	math: {

mathjax: 'https://cdnjs.cloudflare.com/ajax/libs/mathjax/2.7.0/MathJax.js',
config: 'TeX-AMS_HTML-full' // See http://docs.mathjax.org/en/latest/config-files.html
		// pass other options into `MathJax.Hub.Config()`
		TeX: { Macros: macros }
	dependencies: [
		{ src: 'plugin/math/math.js', async: true }
	]

Read MathJax's documentation if you need [HTTPS delivery](http://docs.mathjax.org/en/latest/start.html#secure-access-to-the-cdn) or serving of [specific versions](http://docs.mathjax.org/en/latest/configuration.html#loading-mathjax-from-the-cdn) for stability.

#### MathJax in Markdown
If you want to include math inside of a presentation written in Markdown you need to wrap the formula in backticks. This prevents syntax conflicts between LaTeX and Markdown. For example:
```
`$$ J(\theta_0,\theta_1) = \sum_{i=0} $$`
```
## License