Newer
Older
  <p class="fragment" data-fragment-index="1">Appears first</p>
  <p class="fragment" data-fragment-index="2">Appears second</p>

Hakim El Hattab
a validé
</section>
```
Hakim El Hattab
a validé
### Fragment events

When a slide fragment is either shown or hidden reveal.js will dispatch an event.
Some libraries, like MathJax (see #505), get confused by the initially hidden fragment elements. Often times this can be fixed by calling their update or render function from this callback.
Reveal.on( 'fragmentshown', event => {
// event.fragment = the fragment DOM element
Hakim El Hattab
a validé
} );
Reveal.on( 'fragmenthidden', event => {
// event.fragment = the fragment DOM element
Hakim El Hattab
a validé
} );
```
By default, Reveal is configured with [highlight.js](https://highlightjs.org/) for code syntax highlighting. To enable syntax highlighting, you'll have to load the highlight plugin ([plugin/highlight/highlight.js](plugin/highlight/highlight.js)) and a highlight.js CSS theme (Reveal comes packaged with the Monokai themes: [lib/css/monokai.css](lib/css/monokai.css)).

```javascript
Reveal.initialize({
  // More info https://github.com/hakimel/reveal.js#dependencies
  dependencies: [
    { src: 'plugin/highlight/highlight.js', async: true },
  ]
Below is an example with clojure code that will be syntax highlighted. When the `data-trim` attribute is present, surrounding whitespace is automatically removed. HTML will be escaped by default. To avoid this, for example if you are using `<mark>` to call out a line of code, add the `data-noescape` attribute to the `<code>` element.
```html
<section>
(def lazy-fib
  (concat
   [0 1]

(lazy-cons (+ a b) (rfib b (+ a b)))) 0 1)))
1048
1049
1050
1051
1052
1053
1054
1055
1056
1057
1058
1059
1060
1061
1062
1063
1064
1065
1066
1067
1068
1069
1070
1071
1072
#### Line Numbers & Highlights
To enable line numbers, add `data-line-numbers` to your `<code>` tags. If you want to highlight specific lines you can provide a comma separated list of line numbers using the same attribute. For example, in the following example lines 4 and 8-11 are highlighted:
```html
<pre><code class="hljs" data-line-numbers="4,8-11">
import React, { useState } from 'react';
function Example() {
const [count, setCount] = useState(0);
return (
<div>
<p>You clicked {count} times</p>
<button onClick={() => setCount(count + 1)}>
Click me
</button>
</div>
);
}
</code></pre>
```
<img width="300" alt="line-numbers" src="https://user-images.githubusercontent.com/629429/55332077-eb3c4780-5494-11e9-8854-ba33cd0fa740.png">
#### Step-by-step Highlights
You can step through multiple code highlights on the same code block. Delimit each of your highlight steps with the `|` character. For example `data-line-numbers="1|2-3|4,6-10"` will produce three steps. It will start by highlighting line 1, next step is lines 2-3, and finally line 4 and 6 through 10.
If you would like to display the page number of the current slide you can do so using the `slideNumber` and `showSlideNumber` configuration values.
// Shows the slide number using default formatting
Reveal.configure({ slideNumber: true });
// Slide number formatting can be configured using these variables:
// "h.v": horizontal . vertical slide number (default)
// "h/v": horizontal / vertical slide number
// "c": flattened slide number
// "c/t": flattened slide number / total slides
// You can provide a function to fully customize the number:
Reveal.configure({ slideNumber: slide => {

return [ Reveal.getIndices( slide ).h ];
// Control which views the slide number displays on using the "showSlideNumber" value:
// "all": show on all views (default)
// "speaker": only show slide numbers on speaker notes view
// "print": only show slide numbers when printing to PDF
Reveal.configure({ showSlideNumber: 'speaker' });
Press »ESC« or »O« keys to toggle the overview mode on and off. While you're in this mode, you can still navigate between slides,
as if you were at 1,000 feet above your presentation. The overview mode comes with a few API hooks:
```javascript
Reveal.on( 'overviewshown', event => { /* ... */ } );
Reveal.on( 'overviewhidden', event => { /* ... */ } );
// Toggle the overview mode programmatically
Reveal.toggleOverview();
```
Just press »F« on your keyboard to show your presentation in fullscreen mode. Press the »ESC« key to exit fullscreen mode.
Add `data-autoplay` to your media element if you want it to automatically start playing when the slide is shown:
```html
<video data-autoplay src="http://clips.vorwaerts-gmbh.de/big_buck_bunny.mp4"></video>
If you want to enable or disable autoplay globally, for all embedded media, you can use the `autoPlayMedia` configuration option. If you set this to `true` ALL media will autoplay regardless of individual `data-autoplay` attributes. If you initialize with `autoPlayMedia: false` NO media will autoplay.
Note that embedded HTML5 `<video>`/`<audio>` and YouTube/Vimeo iframes are automatically paused when you navigate away from a slide. This can be disabled by decorating your element with a `data-ignore` attribute.
### Embedded iframes
reveal.js automatically pushes two [post messages](https://developer.mozilla.org/en-US/docs/Web/API/Window.postMessage) to embedded iframes. `slide:start` when the slide containing the iframe is made visible and `slide:stop` when it is hidden.
Sometimes it's desirable to have an element, like an image or video, stretch to consume as much space as possible within a given slide. This can be done by adding the `.stretch` class to an element as seen below:
<h2>This video will use up the remaining space on the slide</h2>
<video class="stretch" src="http://clips.vorwaerts-gmbh.de/big_buck_bunny.mp4"></video>
</section>
```
Limitations:
- Only direct descendants of a slide section can be stretched
- Only one descendant per slide section can be stretched

When reveal.js changes the scale of the slides it fires a resize event. You can subscribe to the event to resize your elements accordingly.
The framework has a built-in postMessage API that can be used when communicating with a presentation inside of another window. Here's an example showing how you'd make a reveal.js instance in the given window proceed to slide 2:
```javascript
<window>.postMessage( JSON.stringify({ method: 'slide', args: [ 2 ] }), '*' );
```
#### postMessage Events
When reveal.js runs inside of an iframe it can optionally bubble all of its events to the parent. Bubbled events are stringified JSON with three fields: namespace, eventName and state. Here's how you subscribe to them from the parent window:
```javascript
window.addEventListener( 'message', event => {
var data = JSON.parse( event.data );
if( data.namespace === 'reveal' && data.eventName === 'slidechanged' ) {
// Slide changed, see data.state for slide number
}
#### postMessage Callbacks
When you call any method via the postMessage API, reveal.js will dispatch a message with the return value. This is done so that you can call a getter method and see what the result is. Check out this example:
```javascript
<revealWindow>.postMessage( JSON.stringify({ method: 'getTotalSlides' }), '*' );
window.addEventListener( 'message', event => {
var data = JSON.parse( event.data );
// `data.method`` is the method that we invoked
if( data.namespace === 'reveal' && data.eventName === 'callback' && data.method === 'getTotalSlides' ) {
data.result // = the total number of slides
}
} );
```
#### Turning postMessage on/off
This cross-window messaging can be toggled on or off using configuration flags. These are the default values.
```javascript
Reveal.initialize({
// Exposes the reveal.js API through window.postMessage
postMessage: true,
// Dispatches all reveal.js events to the parent window through postMessage
postMessageEvents: false
## Markdown
It's possible to write your slides using Markdown. To enable Markdown, add the `data-markdown` attribute to your `<section>` elements and wrap the contents in a `<textarea data-template>` like the example below. You'll also need to add the `plugin/markdown/marked.js` and `plugin/markdown/markdown.js` scripts (in that order) to your HTML file. _Note: both these dependencies are already included in the default `index.html`._
This is based on [data-markdown](https://gist.github.com/1343518) from [Paul Irish](https://github.com/paulirish) modified to use [marked](https://github.com/chjj/marked) to support [GitHub Flavored Markdown](https://help.github.com/articles/github-flavored-markdown). Sensitive to indentation (avoid mixing tabs and spaces) and line breaks (avoid consecutive breaks).
```html
<section data-markdown>
A paragraph with some text and a [link](http://hakim.se).
</textarea>
1231
1232
1233
1234
1235
1236
1237
1238
1239
1240
1241
1242
1243
1244
1245
1246
1247
1248
1249
1250
1251
1252
1253
1254
1255
1256
1257
1258
</section>
```
### External Markdown
You can write your content as a separate file and have reveal.js load it at runtime. Note the separator arguments which determine how slides are delimited in the external file: the `data-separator` attribute defines a regular expression for horizontal slides (defaults to `^\r?\n---\r?\n$`, a newline-bounded horizontal rule) and `data-separator-vertical` defines vertical slides (disabled by default). The `data-separator-notes` attribute is a regular expression for specifying the beginning of the current slide's speaker notes (defaults to `notes?:`, so it will match both "note:" and "notes:"). The `data-charset` attribute is optional and specifies which charset to use when loading the external file.
When used locally, this feature requires that reveal.js [runs from a local web server](#full-setup). The following example customises all available options:
```html
<section data-markdown="example.md"
data-separator="^\n\n\n"
data-separator-vertical="^\n\n"
data-separator-notes="^Note:"
data-charset="iso-8859-15">
<!--
Note that Windows uses `\r\n` instead of `\n` as its linefeed character.
For a regex that supports all operating systems, use `\r?\n` instead of `\n`.
-->
</section>
```
### Element Attributes
Special syntax (through HTML comments) is available for adding attributes to Markdown elements. This is useful for fragments, amongst other things.
```html
<section data-markdown>
<script type="text/template">
- Item 1 <!-- .element: class="fragment" data-fragment-index="2" -->
- Item 2 <!-- .element: class="fragment" data-fragment-index="1" -->
</script>
</section>
```
### Slide Attributes
Special syntax (through HTML comments) is available for adding attributes to the slide `<section>` elements generated by your Markdown.
```html
<section data-markdown>
<script type="text/template">
<!-- .slide: data-background="#ff0000" -->
Markdown content
</script>
</section>
```
### Configuring *marked*
We use [marked](https://github.com/chjj/marked) to parse Markdown. To customise marked's rendering, you can pass in options when [configuring Reveal](#configuration):
```javascript
Reveal.initialize({
// Options which are passed into marked
// See https://marked.js.org/#/USING_ADVANCED.md#options
markdown: {
smartypants: true
}

Presentations can be exported to PDF via a special print stylesheet. This feature requires that you use [Google Chrome](http://google.com/chrome) or [Chromium](https://www.chromium.org/Home) and to be serving the presentation from a web server.
Here's an example of an exported presentation that's been uploaded to SlideShare: http://www.slideshare.net/hakimel/revealjs-300.
### Separate pages for fragments
[Fragments](#fragments) are printed on separate slides by default. Meaning if you have a slide with three fragment steps, it will generate three separate slides where the fragments appear incrementally.
If you prefer printing all fragments in their visible states on the same slide you can set the `pdfSeparateFragments` config option to false.
Export dimensions are inferred from the configured [presentation size](#presentation-size). Slides that are too tall to fit within a single page will expand onto multiple pages. You can limit how many pages a slide may expand onto using the `pdfMaxPagesPerSlide` config option, for example `Reveal.configure({ pdfMaxPagesPerSlide: 1 })` ensures that no slide ever grows to more than one printed page.
1. Open your presentation with `print-pdf` included in the query string i.e. http://localhost:8000/?print-pdf. You can test this with [revealjs.com?print-pdf](http://revealjs.com?print-pdf).
* If you want to include [speaker notes](#speaker-notes) in your export, you can append `showNotes=true` to the query string: http://localhost:8000/?print-pdf&showNotes=true
1. Open the in-browser print dialog (CTRL/CMD+P).
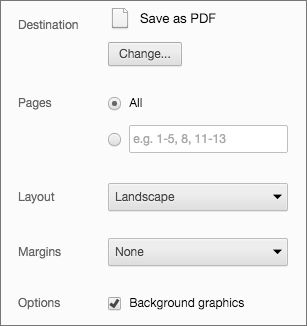
1. Change the **Destination** setting to **Save as PDF**.
1. Change the **Layout** to **Landscape**.
1. Change the **Margins** to **None**.
1. Enable the **Background graphics** option.
1. Click **Save**.

Alternatively you can use the [decktape](https://github.com/astefanutti/decktape) project.
## Theming
The framework comes with a few different themes included:
- black: Black background, white text, blue links (default theme)
- white: White background, black text, blue links
- league: Gray background, white text, blue links (default theme for reveal.js < 3.0.0)
- beige: Beige background, dark text, brown links

- night: Black background, thick white text, orange links
- serif: Cappuccino background, gray text, brown links
- simple: White background, black text, blue links

- solarized: Cream-colored background, dark green text, blue links
Each theme is available as a separate stylesheet. To change theme you will need to replace **black** below with your desired theme name in index.html:
<link rel="stylesheet" href="css/theme/black.css" id="theme">
```
If you want to add a theme of your own see the instructions here: [/css/theme/README.md](https://github.com/hakimel/reveal.js/blob/master/css/theme/README.md).

All theme variables are exposed as CSS custom properties in the pseudo-class `:root`. See [the list of exposed variables](https://github.com/hakimel/reveal.js/blob/master/css/theme/template/exposer.scss).
Hakim El Hattab
a validé
## Speaker Notes

reveal.js comes with a speaker notes plugin which can be used to present per-slide notes in a separate browser window. The notes window also gives you a preview of the next upcoming slide so it may be helpful even if you haven't written any notes. Press the »S« key on your keyboard to open the notes window.

A speaker timer starts as soon as the speaker view is opened. You can reset it to 00:00:00 at any time by simply clicking/tapping on it.
Notes are defined by appending an `<aside>` element to a slide as seen below. You can add the `data-markdown` attribute to the aside element if you prefer writing notes using Markdown.
Alternatively you can add your notes in a `data-notes` attribute on the slide. Like `<section data-notes="Something important"></section>`.
Hakim El Hattab
a validé
When used locally, this feature requires that reveal.js [runs from a local web server](#full-setup).
Hakim El Hattab
a validé
```html
<section>
  <aside class="notes">
    Oh hey, these are some notes. They'll be hidden in your presentation, but you can see them if you open the speaker notes window (hit »S« on your keyboard).
  </aside>
Hakim El Hattab
a validé
</section>
```
If you're using the external Markdown plugin, you can add notes with the help of a special delimiter:

Hakim El Hattab
a validé
<section data-markdown="example.md" data-separator="^\n\n\n" data-separator-vertical="^\n\n" data-separator-notes="^Note:"></section>
# Title
## Sub-title

Here is some content...
Note:
This will only display in the notes window.
#### Share and Print Speaker Notes
Notes are only visible to the speaker inside of the speaker view. If you wish to share your notes with others you can initialize reveal.js with the `showNotes` configuration value set to `true`. Notes will appear along the bottom of the presentations.
When `showNotes` is enabled notes are also included when you [export to PDF](https://github.com/hakimel/reveal.js#pdf-export). By default, notes are printed in a box on top of the slide. If you'd rather print them on a separate page, after the slide, set `showNotes: "separate-page"`.

#### Speaker notes clock and timers
The speaker notes window will also show:

- Time elapsed since the beginning of the presentation.  If you hover the mouse above this section, a timer reset button will appear.
- Current wall-clock time
- (Optionally) a pacing timer which indicates whether the current pace of the presentation is on track for the right timing (shown in green), and if not, whether the presenter should speed up (shown in red) or has the luxury of slowing down (blue).

The pacing timer can be enabled by configuring the `defaultTiming` parameter in the `Reveal` configuration block, which specifies the number of seconds per slide. 120 can be a reasonable rule of thumb. Alternatively, you can enable the timer by setting `totalTime`, which sets the total length of your presentation (also in seconds). If both values are specified, `totalTime` wins and `defaultTiming` is ignored. Regardless of the baseline timing method, timings can also be given per slide `<section>` by setting the `data-timing` attribute (again, in seconds).

In some cases it can be desirable to run notes on a separate device from the one you're presenting on. The Node.js-based notes plugin lets you do this using the same note definitions as its client side counterpart. Include the required scripts by adding the following dependencies:
  dependencies: [
    { src: 'socket.io/socket.io.js', async: true },
    { src: 'plugin/notes-server/client.js', async: true }
  ]

1. Install [Node.js](http://nodejs.org/) (9.0.0 or later)
2. Run `npm install`
3. Run `node plugin/notes-server`
Hakim El Hattab
a validé
Hakim El Hattab
a validé
Plugins should register themselves with reveal.js by calling `Reveal.registerPlugin( MyPlugin )`. Registered plugins _must_ expose a unique `id` property and can optionally expose an `init` function that reveal.js will call to initialize them.
Hakim El Hattab
a validé
When reveal.js is booted up via `initialize()`, it will go through all registered plugins and invoke their `init` methods. If the `init` method returns a Promise, reveal.js will wait for that promise to be fulfilled before finishing the startup sequence and firing the [ready](#ready-event) event. Here's an example of a plugin that does some asynchronous work before reveal.js can proceed:
Hakim El Hattab
a validé
  id: 'myPlugin',
  init: deck => new Promise( resolve => setTimeout( resolve, 3000 ) )
Hakim El Hattab
a validé
Reveal.initialize({
  dependencies: [ { plugin: MyPlugin } ]
}).then( () => {
  console.log( 'Three seconds later...' )
} );

Note that reveal.js will *not* wait for init Promise fulfillment if the plugin is loaded as an [async dependency](#dependencies). If the plugin's init method does _not_ return a Promise, the plugin is considered ready right away and will not hold up the reveal.js startup sequence.
### Retrieving Plugins

If you want to check if a specific plugin is registered you can use the `Reveal.hasPlugin` method and pass in a plugin ID, for example: `Reveal.hasPlugin( 'myPlugin' )`. If you want to retrieve a plugin instance you can use `Reveal.getPlugin( 'myPlugin' )`.
The multiplex plugin allows your audience to follow the slides of the presentation you are controlling on their own phone, tablet or laptop. As of 4.0.0 this plugin has moved to its own repo at <https://github.com/reveal/multiplex>;
If you want to display math equations in your presentation you can easily do so by including this plugin. The plugin is a very thin wrapper around the [MathJax](http://www.mathjax.org/) library. To use it you'll need to include it as a reveal.js dependency, [find our more about dependencies here](#dependencies).

The plugin defaults to using [LaTeX](https://en.wikipedia.org/wiki/LaTeX) but that can be adjusted through the `math` configuration object. Note that MathJax is loaded from a remote server. If you want to use it offline you'll need to download a copy of the library and adjust the `mathjax` configuration value.
Below is an example of how the plugin can be configured. If you don't intend to change these values you do not need to include the `math` config object at all.
  // other options ...

  math: {
    mathjax: 'https://cdnjs.cloudflare.com/ajax/libs/mathjax/2.7.0/MathJax.js',
    config: 'TeX-AMS_HTML-full', // See http://docs.mathjax.org/en/latest/config-files.html
    // pass other options into `MathJax.Hub.Config()`
    TeX: { Macros: { RR: "{\\bf R}" } }
  },

  dependencies: [
    { src: 'plugin/math/math.js', async: true }
  ]

Read MathJax's documentation if you need [HTTPS delivery](http://docs.mathjax.org/en/latest/start.html#secure-access-to-the-cdn) or serving of [specific versions](http://docs.mathjax.org/en/latest/configuration.html#loading-mathjax-from-the-cdn) for stability.

#### MathJax in Markdown
If you want to include math inside of a presentation written in Markdown you need to wrap the formula in backticks. This prevents syntax conflicts between LaTeX and Markdown. For example:
```
`$$ J(\theta_0,\theta_1) = \sum_{i=0} $$`
```
## License